Presentation

001

I have attached brackets to the wall and affixed hooks to each one. This allows the puppet to be presented, suspended in mid-air, but also to be easily removed and activated. The puppet’s form of a bird represents how I view the city, so by allowing individuals to become the puppeteer and activate the puppet themselves, they can choose their own, unique path in the city, through which to manoeuvre the bird . Thus, causing the puppet to view their own interpretation of the city from a bird’s-eye point of view.

Attachment

315 - Copy

I have used screw eyes to fasten the puppet to the rod used to control it.  The screw eyes not only attach the bird but also act as a guide for the mechanical strings.  They guide the threads along the bottom of the rod to where the puppeteer would holding it to allow for easy access to manipulation of the puppet.

317318

Problem

Due to the weight of the wings, the opposing forces on the central tab, to control the movement, are too great and immense force is required to counteract this.  In order to lift the weight of the wings and regain a fluid movement, the puppet will have to be controlled using strings from above attached to the end of each wing.  Therefore, I have decided to suspend the bird from a rod and allow it to become a hand-held, marionette puppet.  In addition, I am going to attach a spring onto mechanism.  By attaching a spring in favour of the strings controlling it from above it will reduce the resisting force and increase the ease of movement.

Also, in order to have the minimum space between the two sides and a simplistic mechanism, I had to not use additional linkages, which would have been space-consuming, to allow for the arcing movement of the wings’ levers but instead allow for minor flexion of the sides and tolerances around pivots to cope with the movement not being transverse (up and down) by leaving it open the operator and audience can see the mechanism, which looks more industrial and enhances that aspect, as well as keeping the body slim and sleek.

Wing

270

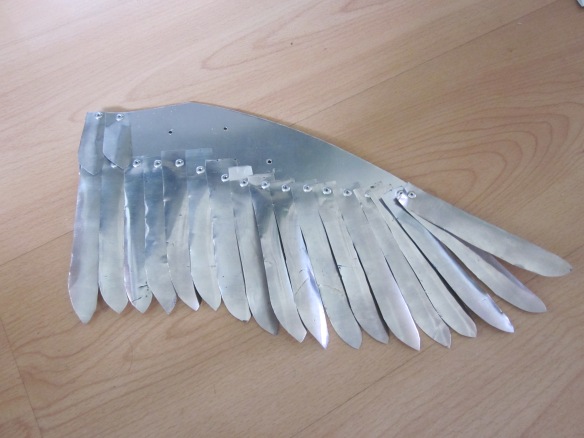
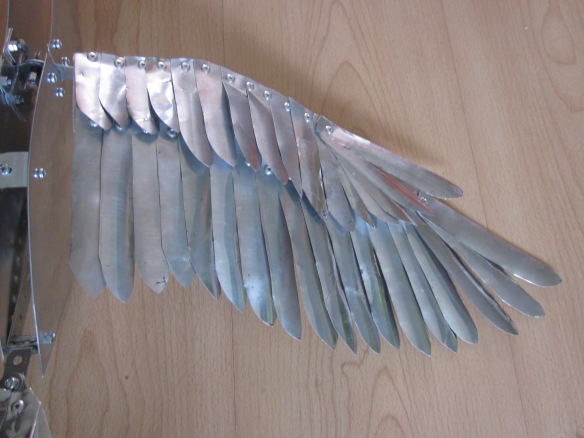
To make the wing I began by fashioning a steel base for support, then cut out and shaped individual feathers from aluminium sheets and riveted each one into place.  I chose to use aluminium for the feathers as it is a lighter material and will reduce the impact it has on the mechanism.

The individual feathers creates the opportunity for subtle movements and adds texture making it more aesthetically pleasing.  By creating two layers of feathers and overlapping them it produces a more realistic effect which adds to the conflicting nature of the piece: the combination of a delicate creature,widely associated with the natural environment, constructed out of harsh, industrial metal.

276


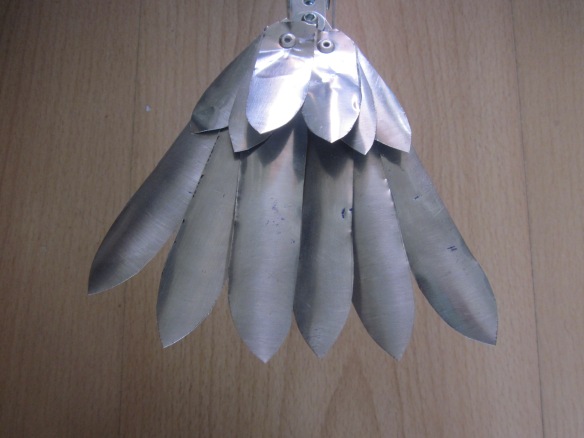
I have also completed the tail in a similar fashion to maintain its aesthetics.

275


I chose to pop rivet the feathers onto the wing and tail as this gave a more professional, engineered look and added to the theme of engineering industry, as well as being a strong form of attachment, which allowed alteration but was less bulky and more aesthetically pleasing than more nuts and bolts, because of the multiple fixings required.

The eye was also formed with a pop rivet, which I positioned to also attach the beak, leaving no additional points of attachment to interfere with the aesthetics of the head.

Clangers

Video

Whilst working on my puppet I became reminded of the Iron Chicken featured in the Clangers.

6294788568_c224cf4a14_o


I find the obvious use of nuts and bolts for its construction very appealing.  I feel it creates a heavy-duty, industrial appearance and gives the puppet a lot of interest. I plan to incorporate elements of this into my own puppet to draw attention to specific areas and emphasize important features.

Body

262


I decided to build the main structure of the body out of steel as this offers structural integrity and sufficient support for the mechanism.  Also, I have sanded down and polished the surface of the steel to try to bring out its reflective qualities.


Mechanism

263

I decided to add additional manipulation to the bird by creating movement in the tail. These are the two mechanisms I have created to control the movement.

To attach/support the mechanisms I have used a bolt, as a pivot, for the movement of the tail and cut a small slit in the metal to guide the wing mechanism, making sure it is long enough to encompass its range of movement and I attached it in place by making two brackets out of aluminium, which I carefully shaped using a swage block, to hold the metal rod/pivot in place.

The longer the lever from the pivot, the shallower the movement of the tail; this was important as it required greater wing movement and lesser tail movement.